tutorial
How to Set Up an IR Remote and Receiver On an Arduino
Infrared (IR) communication is a widely used and easy to implement wireless technology that has many useful applications. The most prominent examples in the day to day life are TV/video remote controls, motion sensors, and infrared thermometers.
There are plenty of interesting Arduino projects that use IR communication too. With a simple IR transmitter and receiver, you can make remote-controlled robots, distance sensors, heart rate monitors, DSLR camera remote controls, TV remote controls, and lots more.
WHAT IS INFRARED?
Infrared radiation is a form of light similar to the light we see all around us. The only difference between IR light and visible light is the frequency and wavelength. Infrared radiation lies outside the range of visible light, so humans can’t see it:
Because IR is a type of light, IR communication requires a direct line of sight from the receiver to the transmitter. It can’t transmit through walls or other materials like WiFi or Bluetooth.
HOW IR REMOTES AND
RECEIVERS WORK?
A typical infrared communication system requires an IR transmitter and an IR receiver. The transmitter looks just like a standard LED, except it produces light in the IR spectrum instead of the visible spectrum. If you have a look at the front of a TV remote, you’ll see the IR transmitter LED:
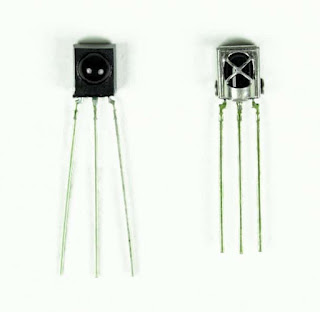
The IR receiver is a photodiode and pre-amplifier that converts the IR light into an electrical signal. IR receiver diodes typically look like this:
Some may come on a breakout board like this:
Note:
Pre-Amplifier: An electronic device that amplifies a very weak signal, for example from a microphone or pickup, and transmits it to the main amplifier.
IR SIGNAL
MODULATION
IR light is emitted by the sun, light bulbs, and anything else that produces heat. That means there is a lot of IR light noise all around us. To prevent this noise from interfering with the IR signal, a signal modulation technique is used.
In IR signal modulation, an encoder on the IR remote converts a binary signal into a modulated electrical signal. This electrical signal is sent to the transmitting LED. The transmitting LED converts the modulated electrical signal into a modulated IR light signal. The IR receiver then demodulates the IR light signal and converts it back to binary before passing on the information to a microcontroller:
The receiver diode detects all frequencies of IR light, but it has a band-pass filter and only lets through IR at 38 kHz. It then amplifies the modulated signal with a pre-amplifier and converts it to a binary signal before sending it to a microcontroller.
IR CODES:
Each time you press a button on the remote control, a unique hexadecimal code is generated. This is the information that is modulated and sent over IR to the receiver. In order to decipher which key is pressed, the receiving microcontroller needs to know which code corresponds to each key on the remote.
Different remotes send different codes for the keypresses, so you’ll need to determine the code generated for each key on your particular remote. If you can find the datasheet, the IR key codes should be listed. If not though, there is a simple Arduino sketch that will read most of the popular remote controls and print the hexadecimal codes to the serial monitor when you press a key. I’ll show you how to set that up in a minute, but first, we need to connect the receiver to the Arduino…
IR Library:
Step 1: downloading IR Remote Library
In order to reverse engineer the remote and obtain the codes for each button, we are going to need to download and install the following library.
https://github.com/z3t0/Arduino-IRremote
Extract the file in your libraries directory. e.g. (C:\Users\TmSolutions\Documents\Arduino\libraries )
https://github.com/z3t0/Arduino-IRremote
Extract the file in your libraries directory. e.g. (C:\Users\TmSolutions\Documents\Arduino\libraries )
Step 2: Add library to sketch
With the IR folder now in your libraries directory, we can import it into a new sketch.
Connection Diagram:
Connection Diagram:

Code:
#include <IRemote.h>
int RECV_PIN = 8;
IRrecv irrecv(RECV_PIN);
decode_results results;
void setup()
{
Serial.begin(9600);
irrecv.enableIRIn(); // Start the receiver
}
void loop()
{
if (irrecv.decode(&results))
{
Serial.println(results.value, HEX);
irrecv.resume(); // Receive the next value
}
}
IRrecv irrecv(RECV_PIN);
decode_results results;
void setup()
{
Serial.begin(9600);
irrecv.enableIRIn(); // Start the receiver
}
void loop()
{
if (irrecv.decode(&results))
{
Serial.println(results.value, HEX);
irrecv.resume(); // Receive the next value
}
}
Output:
You will get the Hexadecimal values for all the buttons in the remote.
You will get the Hexadecimal values for all the buttons in the remote.


No comments:
Post a Comment